The customisability of Android smartphones is one aspect that attracts a lot of users to the platform. While there is the simple stuff Android allows you to do, including changing your theme, wallpaper, font size, or a few animations, a number of other advanced settings are tucked under a neat drawer called the Android Developer Settings menu.
This section, one that Android power users and developers swear by, is usually hidden by default and will first need to be enabled. Following this, you can find a number of new settings here that can help you take your Android experience to the next level.
How to enable Android Developer Settings
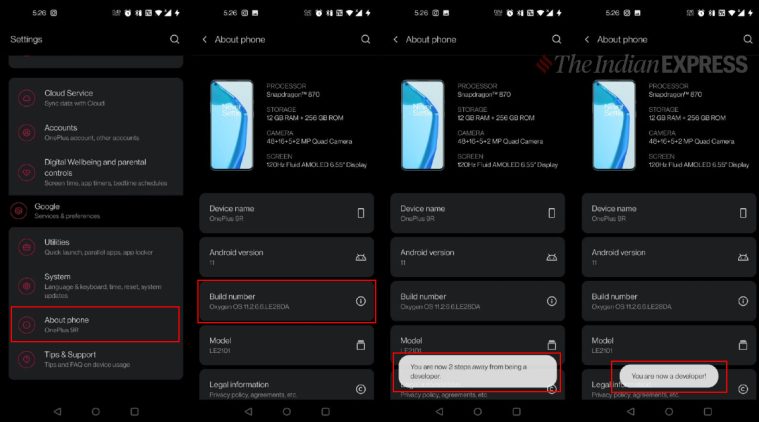
On most Android devices, irrespective of the custom skin on top like OxygenOS, OneUI or MIUI, accessing the Developer Developer Settings page menu involves finding the ‘Build Number’ tab in your Settings/ About Phone section and quickly tapping on it 7 times.
This should display a small message on the bottom of the screen that will say something like “You are now a developer”.
 Here’s how to enable developer settings on your phone. (Express Photo)
Note that on some phones this option may be enabled by tapping multiple times on other elements. For instance, on MIUI it can be enabled by tapping multiple times on the ‘MIUI version’ tab. Check how you can enable the same on your phone.
Once you have enabled the developer settings, they can be found at Settings/ System/ Developer options. Once that is done, here are the top seven Developer Settings that you should know about.
1. Default USB configuration
Most people use their data cables to either charge their phone or to connect it to a desktop/laptop to transfer some files over to the phone. But Android will let choose if you want to transfer data, transfer pictures only, or simply charge the phone every time you connect it to a PC with a USB cable.
However, if you always connect your phone to a PC only to charge it or only to transfer files, then you should check out this section and select a default option that will come into effect every time the cable is connected without you needing to intervene.
2. Force activities to be resizeable
One of the better features of newer versions of Android is the ability to resize app windows in split-screen, enabling you to truly multitask between apps. This gets even better on bigger ‘phablet’ phones or folding devices. However, not all apps will support being resized right away if the developer has not optimised that app already.
This is where you can use the ‘Force activities to be resizeable’ toggle to force these apps into being resized. However, note that this could cause issues on some apps.
3. Select Mock Location apps
Mock location apps allow you to spoof the rest of your phone into thinking you are in a location where you are actually not. You can use this to trick certain apps into offering region-specific content that may not readily be available to you. However, not that you will have to use this setting along with a location spoofing app.
4. Window animation, Transition animation, Animator duration scales
Three of the most useful settings under the Developer Settings section are the animation scale settings. These can let you increase or decrease the duration of window and transition animations, and in some cases, will make your phone appear to perform faster.
Leave the animation duration at 1.0x or 1.5x for long, smooth animations (better on phones with higher refresh rates) or tone it down to 0.5x for faster animations and a snappy experience. Experiment with all three to see what works best for you and feel free to set all three back to 1.0x if you feel uncomfortable.
5. Show taps
Many newer Android phones allow you to record your screens. This is a handy feature that lets you execute commands, play games, or do any task on your phone, and send the screen recording to someone else who can now understand what you’re doing better.
The Show Taps toggle will show a small translucent circle every time you tap or drag on the screen and this is also captured in your screen recordings, making it much easier for anyone watching your recording to follow what’s going on.
6. Advanced Reboot
Turning Advanced Reboot on will open new options when you long-press your power button to shut down/restart your phone. Instead of limiting you to the usual two options, this setting will also let you quickly boot into your phone’s recovery or bootloader, which is handy if you’re a modder or are in the process of gaining root access on your Android.
7. OEM Unlocking
OEM unlocking is a simple toggle, but once turned on, it allows your phone to have an unlocked bootloader. This, in turn, will let you root your Android phone and run custom ROMS on it. If you’re a modder who loves using custom ROMs as I do, this is one of the first options you want to turn on on your new phone.
"Android" - Google News
December 03, 2021 at 04:16PM
https://ift.tt/3EnW1Fr
7 Android Developer Settings you should know about - The Indian Express
"Android" - Google News
https://ift.tt/336ZsND
https://ift.tt/2KSW0PQ
Bagikan Berita Ini


0 Response to "7 Android Developer Settings you should know about - The Indian Express"
Post a Comment